How to Program A Raspberry Pi Pico: My First Steps

This Pico runs Rust. Well… More like, code created by the Rust Compiler runs on this Pico.
What does this post cover?
How to go from receiving a Raspberry Pi Pico fresh in its box, to creating a new project and loading executables onto the chip.
It’s best to view this post as a companion piece to the RP-HAL docs to give perspective and add a few pictures to their already detailed docs.
This was a very alien process for me. I had never programmed a microcontroller without using dedicated IDE tooling before, so this post covers the requirements to prepare and load rust programs onto rp2040 microcontrollers. I’m also new to Rust, but I reckon many hobbyists out there are in the same boat.
Also, I was a doofus and skimmed the docs from the rp-rs team. I probably could have saved myself 2 hours if I had just deliberately read every word of their clear and succinct documentation.
Getting Ready for the ‘Getting Started’
Let’s first get familiarized with the Raspberry Pi Pico platform.
What is ‘doing the micro-controlling’?

The RP2040 is small but mighty
The processor on the board is the RP2040. Below are some key things to keep in mind about it:
It’s 32Bit
It’s a Dual Core processor
It’s an Arm Cortex-M0+ series
These are important things to know because the output from the rust compiler must be compatible with the device you intend to run it on. In our case, the output must be built for the RP2040 processor.
We will see some Rust crates, and other files in the project that help create an executable that the RP2040 can run.
A Few Key Terminologies
There are some key terms to understand before getting into the ‘how-to’.
HAL
Hardware Abstraction Layer - this is a bit of digital kit that allows interfacing directly to device-level stuff. It’s a general term, but I interpret it to mean Hardware speaks one language, the Operating System speaks another, and the Abstraction Layer creates an area where things become understandable between the two because specific interfacing policy is explicitly defined.
Surprisingly, HAL from 2001: Space Odyssey is not named after this.
ELF
Executable and Linkable Format - this is the file format that Rust files are compiled to by default. Our target system is the RP2040, which doesn’t use ELF.
UF2
USB Flashing Format 2 - a specific format for flashing executables to a microcontroller. This is the format that our ELF files will be converted to prior to being loaded onto the chip. Interestingly, these executables are referred to by many people as firmware.
BSP
Board Support Package - a set of tooling that allows a developer to craft executables for a specific board, and also provides a means of getting that executable onto the board.
That’s enough acronyms for now
Knowing these terms makes the next steps much easier to understand. Specifically, the Board Support Package is an important concept to grok, because we need to be able to clearly see the difference between the tools that are being used to work with the controller, vs. the program code that we, the hobbyist or new-to-the-platform professional, wish to craft.
My Gotchas During and After the ‘Getting Started’
This ‘getting started’ from rp-rs was very good, and got me from unboxing, all the way through my first time flashing an LED on the main board. However, I immediately ran into a problem and I had to dig for about 15-20 mins to find the answer. (this was self-inflicted by skimming docs)
PC Can’t Detect the Raspberry Pi Pico After Loading Program for the First Time
Once you install a compiled software to the Pico Platform, it automatically runs that ‘executable’ the moment it receives power. Your development PC will no longer detect the Pico as a USB Device after a program has been loaded. The BOOTSEL button on the board must be held down during device power-up for it to be detectable as a USB device, and to continue programming it. The button can be released after the PC detects the Pico.
The computer you are using will not detect the board again unless you do this step.
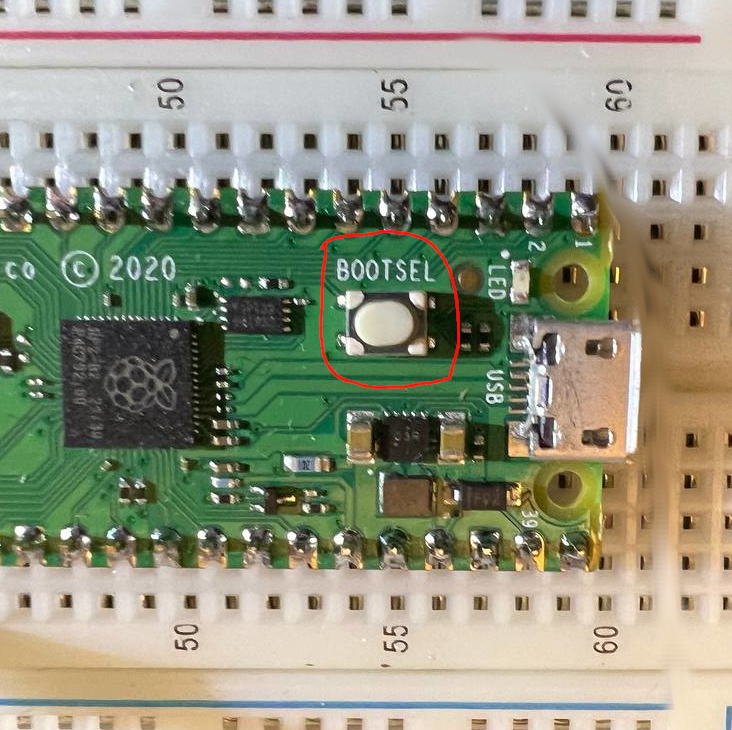
To update or replace an executable on the board, hold Bootsel the button down while you are plugging it in. Holding it down after power is applied does not work.
Note: This procedure is included in the documentation from the rp-rs team in the rp-hal getting-started. My issue was that I didn’t read the docs closely enough. Skimming the docs is NOT recommended.
Getting Programs Onto the Board
The rp-hal project docs cover pretty well how to get a project onto the board.
But I couldn’t wrap my mind around how so much work could be done with the single command below.
cargo run --release --example pwm_blinkThis one command somehow knew which device to load to, which file to compile from, the format to compile into, etc. I couldn’t move past it because it was too magic. I’m going to break this command down because this took me 30+mins of digging to properly understand.
cargo run -> tell the rust package manager to build and execute something
—release -> a flag that tells cargo to create a version of the compilation ‘performance optimized’ for production purposes.
—example -> cargo is set up to be aware that small example programs need to be available to run. These example programs are usually kept in a directory called examples. So the compiler is somehow aware of which directory to look in to find a file’s name or symbol.
pwm_blink -> the name of the example file I chose to run first! There were several files included with the rp-hal project, but this one was the one that caught my eye (what can I say, I dig Pulse Width Modulation.)
But even all this still didn’t cover how the compiler knew which board to load the executable onto, how it knew how to format the code properly, and other tasks that I hadn’t thought of.
Building a New Project Directory
After repeatably loading different example files in the rp-hal project, then creating my own file in the example directory and loading that, I decided I was ready to create my own separate project directory. This was the most difficult part of the process for me.
Toms Obvious Markup Language (TOML) is the markup language that Rust uses by default to build meta-configurations for projects. Here is the Cargo.toml I built in order to be able to create my own project separate from the rp-hal project.
[package]
name = "my-own-blinker-project"
version = "0.1.0"

[target.thumbv6m-none-eabi]
runner = "probe-run --chip RP2040"

[dependencies]
rp2040-hal = "0.7.0"
panic-halt = "0.2.0"
embedded-hal = { version = "0.2.5", features = ["unproven"] }
cortex-m = "0.7.2"
cortex-m-rt = "0.7"
rp2040-boot2 = "0.2.1"

[[bin]]
name = "gp18"
path = "gpio_gp18_blinky.rs"
There is another config that is required as well. The new project must contain a .cargo directory, and within that a file named ‘cargo’ with no mimetype.
I copied the .cargo directory from the rp-hal project and pasted it into mine and this worked.
The Last Troubles
I felt like everything was starting to make sense. I was getting familiar with cargo configuration, and understanding more about how to interface with the chip. However, in my new project I still couldn’t get the program to compile. After all cargo-related errors seemed to be gone, I still encountered this:
error: linking with `rust-lld` failed: exit status: 1-- a BUNCH of file references with no spaces were here. IT was like 50-100 lines long --cannot find linker script memory.xLinker - in the context of microcontrollers this is a tool that creates the data structures and generally the executable that a specific controller can run.
A Linker Script is a file that gives configuration information to the linker for how to set up the executable for that microcontroller. The script we need seems to be mostly assigning memory locations to what appear to be environment variables. I’m not actually sure, that’s info for another post.
Memory.x
this file was missing. The compiler even told me so! It didn’t stop me from digging around on the internet for an hour or so. I just couldn’t accept the idea that a single file might be missing from my project, and that would be the root cause of this error.
But that was the problem. I copied the Memory.X file from the rp-hal directory into my project directory and IT WORKED!
I ran the cargo command, heard the PC level alert that a USB device had disconnected, and the LED started flashing morse code at me. I had created my first project that was ready for program code.
Wrapping Up
That covers all the issues I had, and the main topics I needed to learn to go from unboxing to blinking an LED from within a completely fresh project.
In the next PicoPost, I will have a lot more Rust code. The focus will be on creating an on-off scheduler for controlling a grow light. My first big project with the Pico will hopefully be a Hydroponics garden controller. More on that later though!